


Welcome to the third and final part of this series. If you've come here directly, it is advisable to read the first two parts before you continue.
Table Of Contents
Now that we have handled the Navigation for the app using Cognito, we should move on the final phase, which is the implementation of making and receiving requests to fetch and show data on the app. Since the app that we’re making is a blog app, it should be able to display existing blog posts, create new posts and obtain edit/delete functionalities, all within the app.
We tried doing this before from the dashboard by making GraphQL calls in the first part. We’re essentially doing the same thing, but straight from the app.
Let’s first find the place where our first post was saved. To do that:
Go to your AWS console -> Click on Services -> Click on DynamoDB on the left panel (our default DB) -> Click on Tables.
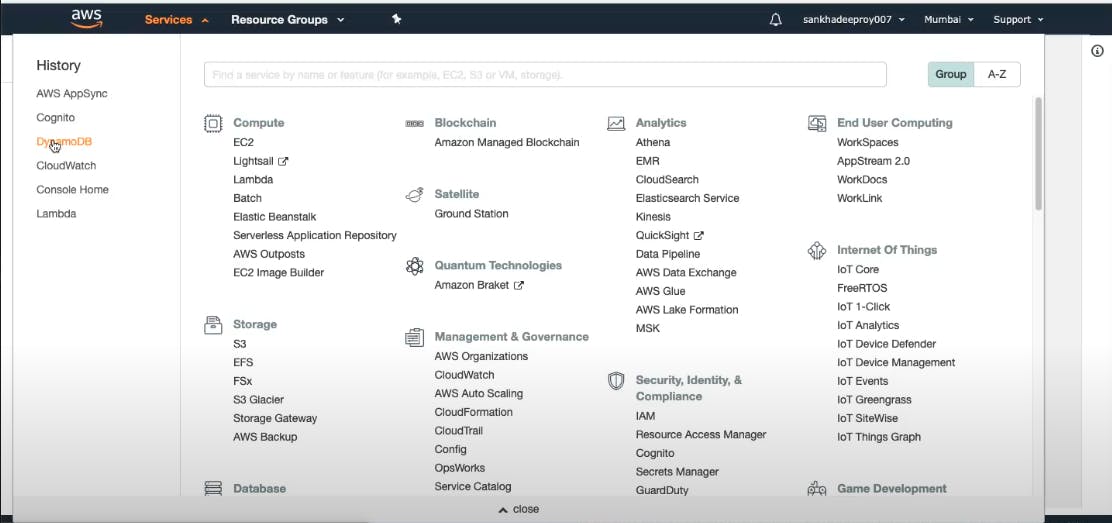
You should see a Table already created (if you’ve been following along). Access the Table and click on Items. There, you will be able to see the post that we created in the first part, just sitting there casually. We created this post using a test account.
Let’s create some with a real account.
Fetching Posts
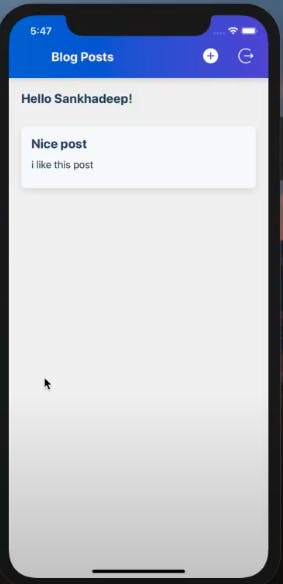
First, login with the main account in the app. Now in the code, make your way to HomeScreen.js. There, you’ll see a constant with the name data, which is an array of dummy objects in the form of the schema that we’ve defined. We’re going to replace this data with the actual data stored in DynamoDB.
Import these statements into the HomeScreen.js file:
import { API, graphqlOperation } from 'aws-amplify'
import * as queries from ‘./../graphql/queries’
The above line retrieves all queries from the DB, which we can filter at a later stage. To fetch posts in the app, add the following code:
async function fetchPosts() {
    try {
      const { data } = await API.graphql(graphqlOperation(queries.listPosts));
      setData(data.listPosts.items);
    } catch (err) {
      console.log(err, 'error fetching todos');
    }
  }

  useFocusEffect(
    useCallback(() => {
      fetchPosts();
    }, [])
  );
This component, whenever mounted, will fetch the posts by making a query to list all posts using queries.listPosts.
We have also wired this data to our UI. We need to create a new State variable to store the data that we’ll be getting. Let’s create a variable and call it data. Initially, it will be an empty array.
const [data, setData] = useState([]);
...but when we get the data, we will display the data using:
const { data } = await API.graphql(graphqlOperation(queries.listPosts));
      setData(data.listPosts.items);
Remember to replace the hard coded
DATAstate with this current state in the UI.
Creating A New Post
We’re going to try the same approach used above to be able add new posts through the app. Adding a new post would essentially be a mutation.
Navigate to CreateScreen.jsand import the same GraphQL query operations statements from above.
Then, add the following lines of code:
import * as mutations from '../graphql/mutations';
const handleSubmit = async () => {
    setLoading(true);
          try {
        const { title, description } = formState;
        await API.graphql(
          graphqlOperation(mutations.createPost, {
            input: { title, description, createdBy: user.email }
          })
        );
        setFormState({});
        setLoading(false);
      } catch (err) {
        setLoading(false);
        console.log('error creating post:', err);
      }

  };
We are importing all mutations from GraphQL. handleSubmit is an async function that will take input fields and return them as title, description and specify the owner of the post.
As far as the ownership of the user is concerned, Amplify stores all attributes like Email, User Pool ID, JWT tokens etc. for every user and uses this data to identify the current user. We don’t have to use this data for our operations at all. We’ll just store the username and email in the context that we’re using.
Navigate to the AppNavigation.js file and find AppNavigation() and add setUser as a constant and add the following line:
setUser({ username: user.username, email: user.attributes.email });
Also, add the following line in AuthContext.js:
const [user, setUser] = useState({});
To consume this data, first add useContext in the import statement and then add the following line of code:
import { AuthContext } from '../AuthContext';
Display the user name with a welcome message by returning user.username.
To handle the situation where a different user signs in, navigate to
LoginScreen.js, addsetUserin the context and define setUser() in the Sign In module.
FInally, to set the ownership of each added post, import the following lines in CreateScreen.js:
const { user } = useContext(AuthContext);
import * as mutations from '../graphql/mutations';
Then add an owner:user.email field in graphqlOperation().
Note that at this point of time, I updated the existing schema to remove some mistakes and add a new operation. I replaced the owner field to createdBy and added an update operation.
At this point, you should be able to create new posts and check them in the DynamoDB table.
Editing Posts
Let’s implement the editing and deleting function for all the posts on the app. While writing these functionalities, it is very important to remember that these functionalities should only be available to the owners of the post and no-one else.
The first thing to do is import an icon in the UI that represents the edit option. Then, navigate to HomeScreen.js and add the following line:
editable={user.email === item.createdBy}
This implements the condition that the edit option is only available on a post when its owner is accessing it. The next is to make sure that when the edit button is tapped, the fields should be prefilled with the existing data, that can be edited and should not be empty.
In HomeScreen.js, import routes, add the navigation & id prop in const Item = () and add the following line to the <TouchableOpacity> for the edited function:
  <TouchableOpacity
            onPress={() => navigation.navigate(routes.Create, { id })}
            style={[t.pX2]}
          >
            <AntDesign name="edit" size={20} color={color.gray900} />
          </TouchableOpacity>
        )}
Also pass navigation to the Item component as a prop.
This will navigate the screen to the edit screen. To populate it with existing data, check the route parameter in CreateScreen.js, get the id of the post and copy the following code in CreateScreen.js:
import * as queries from '../graphql/queries';
const { id } = route?.params || {};
 useEffect(() => {
    getPostById();
  }, []);

  const getPostById = async () => {
    try {
      const { data } = await API.graphql(
        graphqlOperation(queries.getPost, {
          id
        })
      );
      setFormState(data.getPost);
    } catch (err) {
      console.log('error creating post:', err);
    }
  };
Post this, all you need to do is make an update request under handleSubmit:
const handleSubmit = async () => {
    setLoading(true);
    if (id) {
      try {
        const { title, description } = formState;
        await API.graphql(
          graphqlOperation(mutations.updatePost, {
            input: { id, title, description }
          })
        );
        setFormState({});
        setLoading(false);
      } catch (err) {
        setLoading(false);
        console.log('error creating post:', err);
      }
    } else {
      try {
        const { title, description } = formState;
        await API.graphql(
          graphqlOperation(mutations.createPost, {
            input: { title, description, createdBy: user.email }
          })
        );
        setFormState({});
        setLoading(false);
      } catch (err) {
        setLoading(false);
        console.log('error creating post:', err);
      }
    }
  };
This will make the posts fully editable and update the changes in the posts. Of course, with the condition we implemented in the beginning, these changes can only be made by the owner of the posts.
Deleting Posts
Deleting posts is pretty much the same as editing posts. A prop named onDeletePost exists in the code already. So, you can just call it:
const handleDelete = async () => {
    try {
      await API.graphql(
        graphqlOperation(mutations.deletePost, {
          input: { id }
        })
      );
      setFormState({});
    } catch (error) {
      console.log(error, 'error');
    }
  };

  const headerProps = {
    navigation,
    title: id ? 'Edit Post' : 'Create Post',
    ...(id && { onDeletePost: handleDelete })
  };
Put the call in a try-catch blog where we will pass the id of the post that needs to be deleted.
That’s it! You’ll be able to delete the post through the account of the user who own them.
Conclusion
It has been quite a journey but I’m glad that you stuck around till the end. At this stage, we’ve successfully implemented navigation, authentication and the basic functionalities of a blog app using AWS Amplify and its robust features. There is still a lot to explore and experiment with, so you’re more than welcome to do that and share your experiences here in the comments section.
Thank you so much for reading. See you around!
This experiment has been carried out by Sankhadeep Roy , Engineering Manager and AWS Enthusiast GeekyAnts and documented by Digvijay Wanchoo , A. Manager, Marketing & Communications GeekyAnts